Mother’s Day roundup

As you know, Mother’s Day is this Sunday. If you didn’t know…maybe this post will help you with your last-minute scramble to find a present.

I believe handmade jewelry is the perfect present to give women (and some men) for any and every holiday. If you’re not crafty, Etsy is a great place to support jewelry makers. And if you are–here’s a few of my favorite DIYs from other bloggers that you can give mom this year:

mom

1. Fabric Button Earrings from Sada Lewis

These require a few extra materials from the craft store, but you can make a ton of them with just a few pieces of material. You can make them for mom now, friends on their birthdays or sisters and aunts for Christmas–the gift you can keep on giving.

2. Barbed Wire Pearl Drop Earrings from Studs and Pearls

If you’ve done any of my DIYs or have made jewelry before, you probably have the materials you need to make these earrings. If you don’t have the fish hook earring parts, you can make them from long head pins. The “barbed wire” and pearl combo is perfect for moms with a little bit of edge.

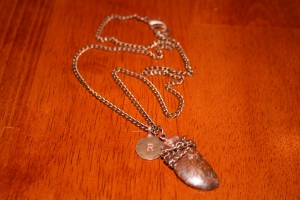
3. Beaded Pendant Necklace from A Beautiful Mess

I have made a few variations of this necklace before–while this DIY lists the cost of materials as $40, you can easily drop this cost by using thrifted beads, natural materials for charms or mixing and matching beads (A Beautiful Mess uses all black onyx).

4. Beaded Tassel Bracelets from I Spy DIY

This bracelet uses embroidery thread to make a tassel, but you can always use a chain tassel if you don’t have thread. I don’t know about you, but this looks like a grown-up version of the yarn-and-bead bracelets I gave my mom when I was a kid. Pretty and nostalgic!

5. Fiona Paxton Necklace from Thanks, I Made It

Awesome DIY of a Fiona Paxton-inspired necklace. If you don’t have enough chain to make a long version, it would still make a cute short necklace.

Gift ideas on this blog:

Ring bracelet

Stone pendant necklace

Button studs

Beginner necklace

If your mom likes wine, you can also make a charm to dress up a gifted bottle. DIY will be up later today!

DIY: Ring bracelet

As I mentioned in my last few posts, I lost my camera cord so I can’t upload photos. While I’m writing this, I am laughing at myself. Why? Because I lost it while spring cleaning. Only I could pull off losing things while trying to get more organized. I’m not a big fan of my iPhone camera, but it will do while I reluctantly order a new cord on Amazon. Just be warned: I am a terrible phone camera photographer. Excuse the poor quality.

So on to the topic of ring bracelets. These are also known as slave bracelets, but I will not refer to them this way. (If you want to know why, check out my post from a few weeks ago.)

I think it’s safe to say I’ve made a bajillion of these. I gave most of them away already but I kept my favorite. It gets tangled easily so it’s a little high maintenance, but I love it just the same.

2015-05-07 21.43.14

This one takes quite a bit of planning, measurement and chain (which I’m running low on), so for this DIY I’ll stick to a more basic ring bracelet.

Supplies:

2015-05-07 21.08.30

  • Chain
  • Headpin or eyepin
  • 2-3 jump rings
  • Clasp
  • Bead (you can use any bead or trinket for this DIY–I would suggest something that will sit flat)
  • Pliers (I used round nose, bent nose and wire cutters)
  • Ring (optional)

The set-up:

  1. Measure the ring portion by draping chain around your middle finger. Do not make this tight or it will be hard to put on and will pull when you wear it. Meet the chain ends directly under your knuckle and trim excess chain with wire cutters.
    1. Note: you can use an actual ring hear if you prefer. Attach to chain using a jump ring and bend it tightly to fit the ring.
  2. Slide bead onto headpin/eyepin and loop each end to secure. I originally attached ends to chain using jump rings (as in photos), but I didn’t like how it looked. Instead, I hooked the loops directly onto the chain.
  3. Measure the bracelet part by attaching the end of the chain to the bead piece and wrap around your wrist. Leave a finger or two worth of room and snip with wire cutters.
    1. If you are making this for someone else, use their wrist or ask to borrow a bracelet. 
  4. Attach clasp on one end and jump ring on the other.
  5. Bask in the compliments and jealous glances directed at your masterpiece!

2015-05-07 21.17.22 2015-05-07 21.19.00 2015-05-07 21.21.00 2015-05-07 21.31.13

DIY: No clasp charm necklace

With all the thrifting and digging through my mother’s jewelry box that I’ve done, I have quite the collection of charms.This is probably my favorite DIY necklace project because it requires less materials and finally puts some of those charms to use. Plus, long necklaces are the best ever. Overstatement? I think not. You can layer them or wear them alone, and they can take jeans and a t-shirt to the next level.

Supplies

  • 2 charms (mine were from old clip-on earrings)
  • 3 jump rings
  • chain
  • Wire cutters, 2 pairs of pliers (flat nose and long or bent nose)

The breakdown

  1. Measure how much chain you need by draping it around your neck. Find the length you like each end to hang at and trim the rest with wire cutters. I like one end longer than the other, but you can make them even if you prefer. Although if you make them the same length, it might look like a bolo tie.
  2. Using your pliers, attach one charm to each end with jump rings.
  3. Connect the chains about half-way down using a jump ring. Make sure you can still pull the necklace over your head.

Go crazy with it! This DIY project can use any kind of charms, pendants, knickknacks. If you use something without an existing loop, you can attach it using a headpin and a wrapped loop, like in my beginner necklace project.

(Note: In my spring cleaning madness, I misplaced my camera cord. Pictures coming soon!)

Got wire scraps?

While working with head pins, you will most likely end up with a pile of trimmings.

What do you do with these? The most obvious answer is to chunk them in the trash, but I like to make them into jump rings. You can’t use the teeny tiny ones for this but if you use longer head pins, you will end up with plenty of scraps that will be pliable.

So here’s how:

Pinch the end between the prongs of your round nose pliers and twist inward until it forms a loop. The size of the jump ring will depend on your plier placement–the closer to the end of the prongs, the smaller it will be. With the ends side-by-side, trim them simultaneously with your wire cutters. Use pliers to close the jump ring.

Almost any jewelry you make will require jump rings, so hopefully this will save you some money and prevent wasting usable material. Happy crafting!

(Note: In my spring cleaning madness, I misplaced my camera cord. Pictures coming soon!)

DIY: Super simple chain tassels

I must admit something. Every time I go to write a DIY post, I want to title it a variation of “super simple,” “easy,” “beginner,” etc. And I probably have, so sorry if it sounds repetitive. I just really wanted to express that this is truly a beginner blog, with projects that anyone can do. If I reference a technique or even a type of pliers, I will typically link to a resource–mine or elsewhere on the interwebs–to guide you through the DIY.

That being said, here is a super simple way to make tassels you can use for earrings or necklaces. Tassels are my favorite. Any time I get stuck on how to finish a pair of earrings, I add tassels and suddenly they look thought out and complete.

My tassel-making method is pretty rough and tumble, and this would be a great opportunity to use scraps of leftover chain. I don’t measure the chain because I like the lengths of each piece to be a little different. You can measure if you prefer.

Open a jump ring and slide on the end of a piece of chain. At the length you would like the tassel to be, fold the chain and slip the top link onto the jump ring. Save your cuts until the end to make sure you like the way it looks. Continue until you fill the jump ring or you’re happy with the tassel.

Close the jump ring and whip out your wire cutters. Cut a link off the bottom of each connected piece to separate them.

(Note: In my spring cleaning madness, I misplaced my camera cord. Pictures coming soon!)

Update: Tassels were a trend at the Met Gala earlier this week (May 5)!

DIY: Stone pendant necklace

In my Thrifty Tuesday post yesterday, I included a photo of some stones I found at a vintage store in Dallas. I couldn’t wait to do something with them, so I came up with a way to make them into pendants. You could do this with any stone you find.

Supplies:

  • Stone
  • Chain
  • Glue (preferably clear glue–I used a hot glue gun and it turned out messy)
  • 1 head pin
  • 3 jump rings
  • Lobster or other clasp

IMG_7585  IMG_7598

Making the pendant

  1. Wrap a scrap of chain around the top of your stone.
  2. Slip head pin through chain on the back and twist ends into a wrapped (or simple) loop at the top.
  3. Secure chain and loop with glue.

Attach pendant to chain and complete with the lobster clasp and jump rings. I also fastened a circular charm with my initial that I found in a vintage store. I only had hot glue, so the back of mine looks a little rough.

IMG_7600  IMG_7597

A clear glue like Gorilla Glue or Super Glue would probably work better. I used about 18″ of chain, so mine hangs about mid-chest. This pendant would also work on a 20-30″ chain.

Thinking outside the craft store

I’ve already established that thrift stores are the greatest place on Earth. Don’t get me wrong, craft stores are also great. But often times when I turn the corner into the jewelry aisle, I start wanting everything. “Ooh, I want those beads! And that chain! And look, it’s a necklace-making kit!” These thoughts start flooding my head and next thing you know, I can only think of designs with these items.

More often than not, I feel that this craft store state of mind limits my creativity. I start seeing what the displays want me to see–buy this book, this material, make this necklace. People who design craft store displays are geniuses. They play on what’s trendy or what everyone is Pinteresting (not sure of the proper term). When skulls are popular, you will find a display of skulls, next to a book about skull jewelry, next to a kit that makes skull jewelry a snap. Even their websites are this way.  

To bust out of this craft store rut, I like looking for atypical materials. Here are a few examples, and a few DIY projects that might inspire you (some links are to blog posts outside of wreck. renew. repeat.)…

These are just a few ideas to get you thinking outside of the jewelry aisle at the craft store. You can pretty much use any material you come across (as long as it isn’t perishable…). You will still need to visit a craft store for most projects to pick up head pins and jump rings, but grab them and run. Get out into the world and try to find supplies in random places. It may be a disaster sometimes, but craft disasters make for funny stories. Trust me, I have a ton of ’em.

2015-03-16 17.54.03

I made this today from a stone, chain and beads (from thrifted items).

DIY: Beginner necklace

For me, thrift store hunting often results in finding interesting beads. They’re everywhere. In this post, I’m going to show you how to make a basic necklace using chain and a single bead. This is a great project because you can make any bead into a charm and swap them out to match your outfit or mood. This is a very basic, beginner necklace so it might be too easy if you have jewelry making experience. Now for the fun part:IMG_7409

Supplies

  • Interesting bead
  • 3 jump rings
  • 1 head pin
  • Chain, approx. 16″ long
  • Lobster claw or other style clasp
  • Wire cutters, round nose and bent nose pliers

Making the charm

  1. Put the head pin through the bead. Leaving a little space above the bead, use the bent nose pliers to bend the head pin to a 90 degree angle.
  2. With the round nose pliers, pinch the head pin at the bend and loop the pin around it.
  3. Use the bent nose pliers to wrap the end around the space between the bead and the loop. Clip extra wire with your wire cutters.

IMG_7418 IMG_7421 IMG_7425

This is called a wrapped loop. Alternatively, you could make the charm using a simple loop but I like the look of wrapped loops for this necklace.

Chain necklace

  1. Attach a jump ring on one end of your chain, and a jump ring and lobster clasp on the other.
  2. Connect the charm to the chain using a jump ring.
  3. Voila, you’re finished!

IMG_7426 IMG_7431 IMG_7440

Copycatting

I firmly believe it’s okay to copy other people’s jewelry. Imitation is the sincerest form of flattery, am I right? Let me clarify by adding that I believe it is okay to copy if you do not plan to sell. It is one thing to practice jewelry making by copying pieces you like, it is another to make money off someone else’s designs.

When I first started playing with jewelry, I wanted to make things, bend things, create things. But everything I came up with, I didn’t want to wear. It was just a little… messy. So I started copying jewelry from blogs or Urban Outfitters or Instagram pictures. This made me really think about the final product before I began and analyze how I would have designed it differently. Now I waste less materials (mess-ups can be costly), and I actually wear what I make.

What type of jewelry do you buy?

Start there. If you always buy statement necklaces with colored beads, try finding one you like and copying it. You will be more likely to finish it and it won’t collect dust hanging in your closet.

Move on.

Spend some time copying, but follow your own impulses and ideas as well. I have recently become a fan of mood boards. I tend to be a little all over the place, and they help me focus to one idea. I look through magazines and tear out pictures of jewelry I like, current trends and things that have a retro or bohemian vibe. Sometimes it can be a font, color, pattern or photo that sparks an idea–throw those in there too. You can also make them digitally, but I like tangible ones that I can hang in my closet or above my desk.

I also use Evernote and drop in photos or blog posts that I stumble across.

Screen shot 2015-03-03 at 12.39.34 AM

DIY Button studs

This will be just about the easiest DIY you will ever do, and will take all of five minutes. For my supplies, I used buttons from a bag I bought at a vintage store. I have also used this method to make clip-on earrings into studs. I find clip-ons to be just about the most uncomfortable accessories ever. How did people ever wear clip-ons anyway?  

IMG_7364

Supplies:

Instructions:

Using your handy-dandy wire cutters, clip off the button shanks and try to get the back as flat as possible.

IMG_7367 IMG_7370

Put a dot of glue in the center of the back of the button and press on an earring back. Pick of any excess glue.

IMG_7374 IMG_7376

Done! See, wasn’t that easy?

IMG_7399