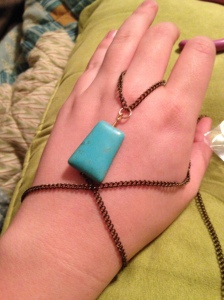
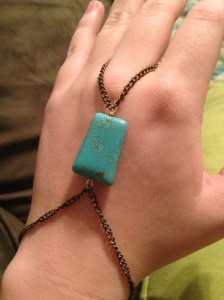
As I mentioned in my last few posts, I lost my camera cord so I can’t upload photos. While I’m writing this, I am laughing at myself. Why? Because I lost it while spring cleaning. Only I could pull off losing things while trying to get more organized. I’m not a big fan of my iPhone camera, but it will do while I reluctantly order a new cord on Amazon. Just be warned: I am a terrible phone camera photographer. Excuse the poor quality.
So on to the topic of ring bracelets. These are also known as slave bracelets, but I will not refer to them this way. (If you want to know why, check out my post from a few weeks ago.)
I think it’s safe to say I’ve made a bajillion of these. I gave most of them away already but I kept my favorite. It gets tangled easily so it’s a little high maintenance, but I love it just the same.

This one takes quite a bit of planning, measurement and chain (which I’m running low on), so for this DIY I’ll stick to a more basic ring bracelet.
Supplies:
- Chain
- Headpin or eyepin
- 2-3 jump rings
- Clasp
- Bead (you can use any bead or trinket for this DIY–I would suggest something that will sit flat)
- Pliers (I used round nose, bent nose and wire cutters)
- Ring (optional)
The set-up:
- Measure the ring portion by draping chain around your middle finger. Do not make this tight or it will be hard to put on and will pull when you wear it. Meet the chain ends directly under your knuckle and trim excess chain with wire cutters.
- Note: you can use an actual ring hear if you prefer. Attach to chain using a jump ring and bend it tightly to fit the ring.
- Slide bead onto headpin/eyepin and loop each end to secure. I originally attached ends to chain using jump rings (as in photos), but I didn’t like how it looked. Instead, I hooked the loops directly onto the chain.
- Measure the bracelet part by attaching the end of the chain to the bead piece and wrap around your wrist. Leave a finger or two worth of room and snip with wire cutters.
- If you are making this for someone else, use their wrist or ask to borrow a bracelet.
- Attach clasp on one end and jump ring on the other.
- Bask in the compliments and jealous glances directed at your masterpiece!


Lovely DIY post!
💜
helloscarlettblog.com
LikeLike